Hello, I’m learning Blender. Looking for lighting critiques that will help me focus on a path to learning more. This is rough animation.

Hello, I’m learning Blender. Looking for lighting critiques that will help me focus on a path to learning more. This is rough animation.
This is a good start. I even think the corridor shot at the end is great as it is and you could apply some of the same techniques to the earlier parts. Let me explain why I think this.
Everything is reflective in a plastic world. You want to keep this in mind when lighting the scene. Wide area lights give reflections that wrap around the object’s shapes, they make the reflective nature of the material well apparent and fill the material, preventing it from looking flat and boring.
This is a good example where you did this well:
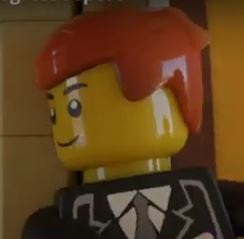
If you are trying to capture the look of real legos, you would prefer using light sources that look plausible for that context. If you were filming some legos in real life, you would need to light them with light bulbs, which are really big compared with the legos. Those light bulbs would cause wide speculars and soft shadows (unless they were really far away from the legos). Sunlight would also be an option. What you couldn’t really do is a small light source which is close to the scene.
Your first scene has small speculars and sharp reflections, which makes me think you used a small radius point or spot light. A wider light radius or area lights might give nice results.
Your corridor scene has interesting colors, with blueish reflections opposing golden sunlight. By contrast, the first scene looks more dull, with the light being so white. Maybe there could be some faint colored reflections on the characters? Some gentle colored area lights coming form the sides and behind the camera could help with this (and with my previous points too).
If you have the render capacity to spare, there are some other things you could do to capture the look of legos. I include them though they are not entirely lighting related.
Depth of field. Legos are small, which means a camera would have to be focussed really close. This would cause a well noticeable depth of field. In fact, a strong depth of field tends to be a pretty good indicator that you are looking at a photo of a miniature.
Textured roughness on all plastic. Legos would have scratches and fingerprints on them. Try finding a seamless scratch/smudge texture and plugging it in the roughness of the materials (it might need to have its intensity adjusted with a color ramp). The first half of this video show what I’m talking about.
https://www.youtube.com/watch?v=bcfzTaC-fEk
These are great suggestions, thank you very much.
I will learn more about the lights as you suggested.
I was hoping to find a way to do procedural plastic look with scratches and smudges on the plastic. but it did not turn out very well so I removed them. That texturing video you recommended looks very good.
Thank you,
The only thing that I’d probably change here is: “the reveal.” The person is pulling back the cover off “the brick,” but we do not actually see it. I don’t think that you can omit those precious few seconds. We need to see it and to absorb it, and to watch the other characters also “absorbing it” and then “reacting to it.”
(Remember: you must “show, don’t tell™” their reactions!)
Also: in the business that follows, "I’m afraid that I become lost." I no longer understand “what the fuss is about.” Maybe that “reveal” might have shown it.
The LEGO animation of “their fussing about” is all well and good. (“Production-wise,” all of this is fine.) But, I no longer understand why the characters are doing it.
I agree with all the suggestions, thank you.
I also wanted to introduce the gala’s host first. Have him tap is champagne glass to get everyone’s attention; before the doors open.
When the thief pops out behind the guest, have the thief put on sunglasses (the same sunglasses seen on his calling card disc) before he takes out his phone.